Many of us worry about our picture that is too big size. Some website didn’t permit big size image to upload as profile picture. Some website has some restriction and limit on file size. You need to determine what type of restriction that website has. There are three types of restriction. They are –
1. File size
2. Image dimension
3. Image type
We will not discuss about image type. Image type may be JPG or GIF. You can read more about these formats on net.
Image dimension consist with width and height that measure with pixel. Other measurement unit exists to measure width and height but we will ignore those unit cause maximum website deal with pixel. For change file dimension you need to use image editing software and you need to have a little bit expertise about image. I just show you how you can reduce or enlarge an image dimension with most common and popular software Photoshop. Please note, I just show you a way to change. There has several ways to change the image dimension. Now just follow the following steps…
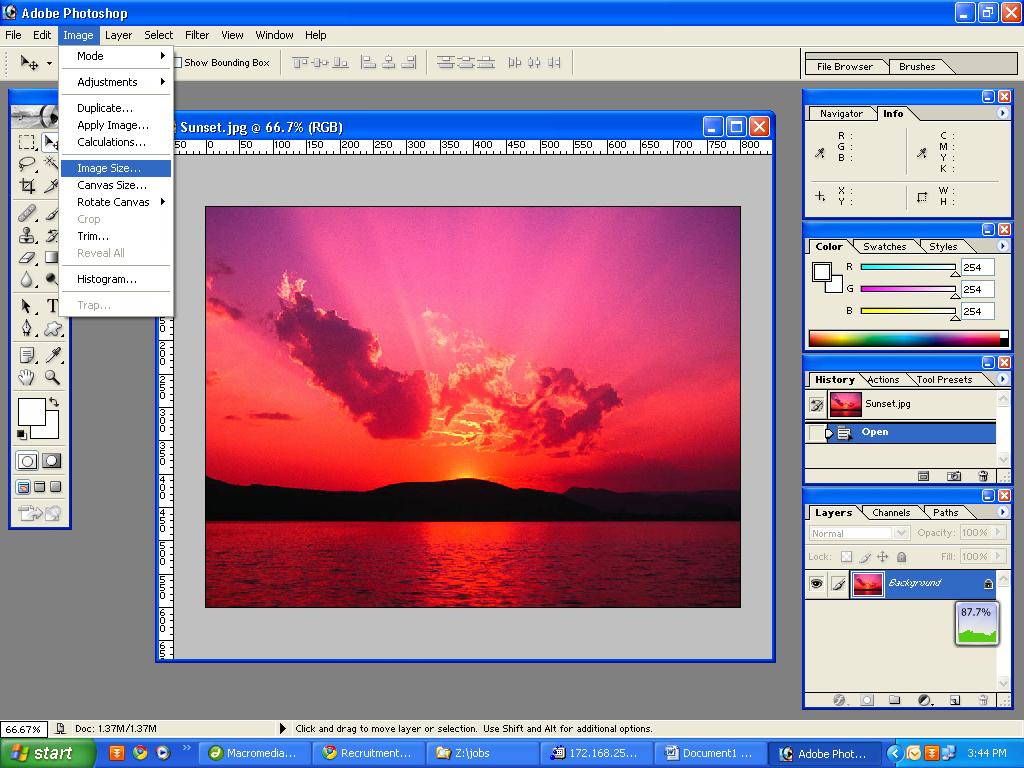
Step # 01: Open your document into Photoshop.
Step # 02: Go to “Image” >> “Image Size”
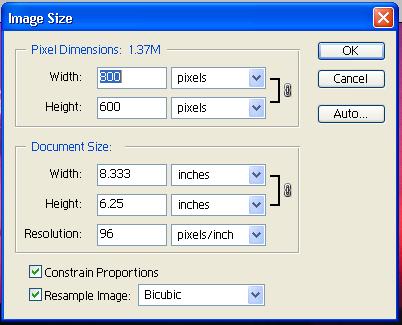
You will get a dialogue box to change image size.
Step # 03: Now in image size dialogue box you need to change “Pixel Dimension”. Before change pixel dimension you need to care about some properties…
- Mark check box of “Constrain Proportions”
- Resolution of “Document Size” portion can be 96. If it is not 96 then change it to ‘96’. And the unit will be ‘pixel/inch’
Step # 04: Now change your desire width and height at “Pixel Dimensions” area. Please note, you must not touch width and height at “Document Size” area.
Step # 05: Click ok and save your image with default options.
That’s all you saved your image with desire width and height. But still your document is big in size. Don’t worry continue reading you will get a solutions. Ohh, please note, when you change resolution, the image width and height may be change automatically. Doesn’t worry just ignore it! You must follow the steps sequentially i.e. at first check “Constrain Proportions” then change “Resolution” then change dimensions.
Image files size measure with Byte, Kilo Byte, Mega Byte, etc. Most website permit user in Kilo Byte size. If you want to know more about file size then you need to surf net. But for this tutorial you need to know the hierarchy of unit.
Bit ———- unit
Byte ——— its also an unit but its big then bit by 8 times
Kilo Byte ——– big size then byte 1000 times
And Mega, Giga… so on
Now at first you need to check your image file size. It’s easy, right click of your mouse on to your image and click properties. There you will get information of your image file size. If it is less then restricted size then don’t need to read down. Just upload your image into that site!
So, you have a big file sized image! Don’t worry; I’m here to help you. Just follow these steps –
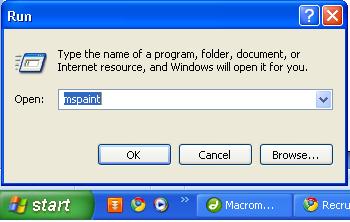
Step # 01: Open ‘mspaint’. Go to start >> click on run
Step # 02: You will get a small box. Type ‘mspaint’ and click ‘Ok’
Step # 03: This command will open Microsoft Piant tools for your service. Open your document.
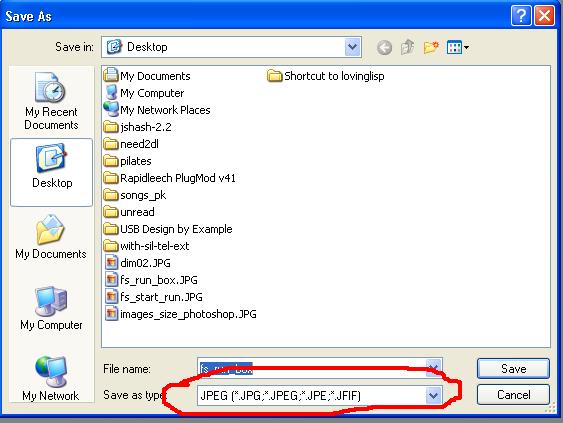
Step # 04: Now save as the document by File >> Save As. Please choice JPEG from ‘Save as type’ drop down list
Step # 05: Save your image with a different name.
Step # 06: Now check file size again by right click on file and go properties.
It’s done! The size is down dramatically.
Enjoy computing…


