the fact of real shit

Execute React JS in ntfs partition

I do development in mounted hard drive which is different than OS partition, also I like to use that mounted drive within different OS like windows and linux simultaneously. Which allow me portability of my code backup in different system.

Challenge is, I have to use such file system for that mounted drive which can accessible in most of the OS like windows, linux or iOS. And in this case NTFS is the best file system which is really portable. Problem for this FS is, it can’t support executable bit of linux which lead to raise many problem in React development. Like if you put any React project into that mounted drive, you can’t execute that code.

To solve this problem I take Docker as a solution. Simply, I create docker image of React project and execute that image. Here is the simple Dockerfile for React project –

FROM node:18
WORKDIR /app
COPY package.json ./
RUN npm install
RUN npm install -g npm@9.7.2
COPY . ./
EXPOSE 3000
CMD ["npm", "start"]

You just need to build this docker image and need to run. You can see docker log for any output for your React project.

Posted in ubuntu, windowsTagged , , , ,

Batch file that will create skeleton directories of ZF2

After a long time write a batch file to create a skeleton directory for Zend Framework 2 module. Hope it may help someone who work in windows 7 OS

@echo off
@setlocal ENABLEDELAYEDEXPANSION
@rem this file will create required empty directory of a ZF2 module
@rem author Shahadat Hossain Khan (shahadathossain.com)
ECHO.
IF "%~1"=="" GOTO noModuleName
SET modName=%~1
CALL :UCase %modName% _UCMN
CALL :LCase %modName% _LCMN
IF NOT EXIST "%_UCMN%" (
 MKDIR %_UCMN%
 MKDIR %_UCMN%\config
 MKDIR %_UCMN%\src
 MKDIR %_UCMN%\src\%_UCMN%
 MKDIR %_UCMN%\src\%_UCMN%\Controller
 MKDIR %_UCMN%\src\%_UCMN%\Form
 MKDIR %_UCMN%\src\%_UCMN%\Model
 MKDIR %_UCMN%\view\
 MKDIR %_UCMN%\view\%_LCMN%
 MKDIR %_UCMN%\view\%_LCMN%\%_LCMN%
 ECHO Directory created. Named - %modName%
) else (
 ECHO Directory already exist!
) 
GOTO:EOF
:noModuleName
ECHO You must provide module name along with this command as 1st argument
GOTO:EOF


:LCase
:UCase
:: Syntax: CALL :UCase _VAR1 _VAR2
:: Syntax: CALL :LCase _VAR1 _VAR2
:: _VAR1 = Variable NAME whose VALUE is to be converted to upper/lower case
:: _VAR2 = NAME of variable to hold the converted value
:: Note: Use variable NAMES in the CALL, not values (pass "by reference")
set varX=%1
set frstChar=%varX:~0,1%
set rstChar=%varX:~1%
FOR %%Z IN (Aa Bb Cc Dd Ee Ff Gg Hh Ii Jj Kk Ll Mm Nn Oo Pp Qq Rr Ss Tt Uu Vv Ww Xx 
Yy Zz) DO (
 SET pX=%%Z
 set c1=!pX:~0,1!
 set c2=!pX:~1,1!
 IF /I "%0"==":UCase" (
 if %frstChar%==!c1! SET _Abet=!c1!
 if %frstChar%==!c2! SET _Abet=!c1!
 )
 IF /I "%0"==":LCase" (
 if %frstChar%==!c1! SET _Abet=!c2!
 if %frstChar%==!c2! SET _Abet=!c2!
 )
)
SET _Word_Rtrn=%_Abet%%rstChar%
SET %2=%_Word_Rtrn%
GOTO:EOF


endlocal

Usage

<your batch file name> <the module name>

Posted in php, webdevelopment, windowsTagged , , , , , , ,

Install Zend Framework 2 into Windows IIS

This article will show you how you can install Zend Framework 2 into your windows OS without composer.phar help.

1. Download latest stable copy of ZF2 from http://framework.zend.com/downloads/latest and unpack, we call it ZF2

2. Download latest stable copy of ZF2 skeleton app from https://github.com/zendframework/ZendSkeletonApplication/ and unpack, we call it ZF2Skeleton

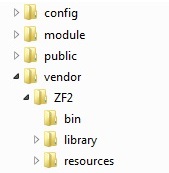
3. Create folder like <ZF2Skeleton folder>/vendor/ZF2. Now copy ZF2/* into <ZF2Skeleton folder>/vendor/ZF2 And the final directory structure may look like following image (for ZF2 version 2.3.1 dated 20140426)

zf2 basic folder structure

4. Now point any domain into “public” folder. e.g. zf2.localhost.tld

  • 4.a. Open notepad as administrator user
  • 4.b. Add an entry to your hosts (file) like – “127.0.0.1 zf2.localhost.tld” [one host in each line]
    • 4.b.1 hosts file is typically located at C:\WINDOWS\system32\drivers\etc\hosts
  • 4.c Now save the hosts file and close
  • 4.d. Now create an entry in your IIS (6 or 7 both are same procedure) by following http://support.microsoft.com/kb/816576 with the above host name i.e. zf2.localhost.tld

5. Now you need to fix ZF2_PATH or $zf2Path variable at “/init_autoloader.php” file of root to point our “/vendor/ZF2” folder

Find following code:

$zf2Path = false;
if (getenv(‘ZF2_PATH’)) { // Support for ZF2_PATH environment variable
$zf2Path = getenv(‘ZF2_PATH’);
} elseif (get_cfg_var(‘zf2_path’)) { // Support for zf2_path directive value
$zf2Path = get_cfg_var(‘zf2_path’);
}

Replace by following code:

define(‘DS’, DIRECTORY_SEPARATOR);
define(‘APP_ROOT_PATH’, dirname(__FILE__).DS);
$zf2Path = false;
if (is_dir(APP_ROOT_PATH.’vendor’.DS.’ZF2′.DS.’library’)) {
$zf2Path = APP_ROOT_PATH.’vendor’.DS.’ZF2′.DS.’library’;
} elseif (getenv(‘ZF2_PATH’)) { // Support for ZF2_PATH environment variable or git submodule
$zf2Path = getenv(‘ZF2_PATH’);
} elseif (get_cfg_var(‘zf2_path’)) { // Support for zf2_path directive value
$zf2Path = get_cfg_var(‘zf2_path’);
}

You can now visit zf2.localhost.tld to get your expected site.

Please note, you must run latest copy of PHP (at least bigger then 5.3.23 when I write this article there I found version 5.3.28 stable for windows non thread safe version installer for download) from http://windows.php.net/download/

Now the problem is URL route in IIS. That means when you lookup into ZF2 getting started docs you may find some code to edit .htaccess of apache. What about IIS in this case?

IIS have solution of URL rewrite problem. Visit www.iis.net/urlrewrite to get the latest copy of the plugin to attach into your IIS installation. Just install this addon/plugin/extension/demon/program whatever name you called.

After installation you need a file web.config into your “<ZF2Skeleton folder>/public” folder. No matter, here we do a small trick. Just download Drupal 7+ core from https://drupal.org/project/drupal and unpack it. There you found a web.config file at root path. Just copy and paste that file into your <ZF2Skeleton folder>/public folder.

That’s all folk!

Posted in php, webdevelopment, windowsTagged , , , , , , , ,

Normal user privilege problem for using WiMax USB Modem in windows 7

This is my first post from my laptop. From now on I can write from my home. Recently I buy a Dell Core i3 laptop made in china. Please note, I’m from Bangladesh. Here we all enjoy duty free & all kind of tax fee computer peripheral. Thats why we get these technological facilities with cheap rate. Anyway, Its not my issue. After getting laptop I get a connection from our local WiMax service provider Bangla Lion. Their’s modem is USB modem. Its nice after installation and configuration. Problem is for other users of my laptop…

I always like to use computer with normal user rather then administrator user. Here I can impose many restriction for security reason to fight with VIRUS. So, when I login with my another normal user I fail to connect with my provider… I phone them customer support they didn’t get any solution. So, I start R&D for this issue and finally got success for 6 hours. I’m using windows 7 that was with my laptop and off-course pirated copy (thanks MS, really we Bangladeshi techi personnel can’t achieve the latest trend if we don’t get this facilities). So, guys if you face any problem just do following……

  1. Install your modem with administrator account as usual normal installation. Nothing special while installation process.
  2. Now go to the folder where you installed your modem and change security settings
  3. Add your user’s for permit to use modem with read-write permission to that folders & its content’s and sub-folders.
  4. Then go to windows firewall settings and add your modem software permit for both communication of home and public. I know this may cause a security whole if you can’t trust your provider. But if you trust your provider’s software its not a problem at all.

Actually my modem need write permission to that folder. May be some file it modify before starting to program file path. And it can’t write to that path and forbidden to use the modem.

Hope this post will save someone’s 5~6 hours just for 15 mins…. lols

Posted in internet, windowsTagged , , , , , , , , , ,

How reduce your image size without losing quality for using profile picture of web page

Many of us worry about our picture that is too big size. Some website didn’t permit big size image to upload as profile picture. Some website has some restriction and limit on file size. You need to determine what type of restriction that website has. There are three types of restriction. They are –
1. File size
2. Image dimension
3. Image type
We will not discuss about image type. Image type may be JPG or GIF. You can read more about these formats on net.
Image dimension consist with width and height that measure with pixel. Other measurement unit exists to measure width and height but we will ignore those unit cause maximum website deal with pixel. For change file dimension you need to use image editing software and you need to have a little bit expertise about image. I just show you how you can reduce or enlarge an image dimension with most common and popular software Photoshop. Please note, I just show you a way to change. There has several ways to change the image dimension. Now just follow the following steps…
Step # 01: Open your document into Photoshop.
Step # 02: Go to “Image” >> “Image Size”
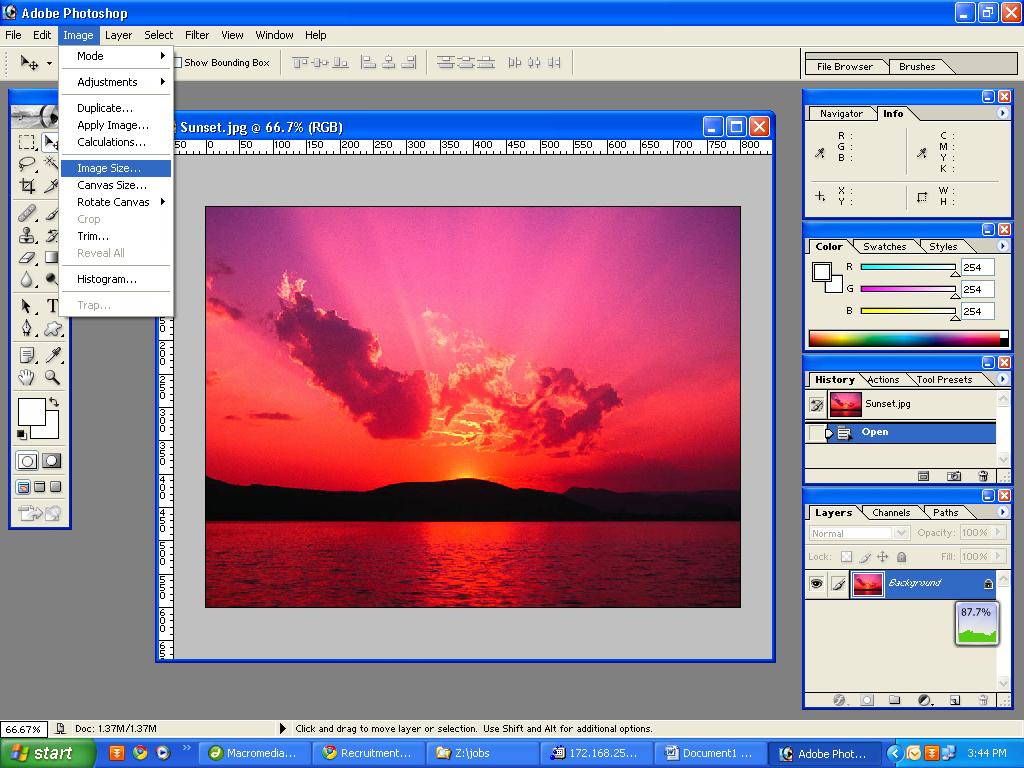
You will get a dialogue box to change image size.

Step # 03: Now in image size dialogue box you need to change “Pixel Dimension”. Before change pixel dimension you need to care about some properties…

  1. Mark check box of “Constrain Proportions”
  2. Resolution of “Document Size” portion can be 96. If it is not 96 then change it to ‘96’. And the unit will be ‘pixel/inch’
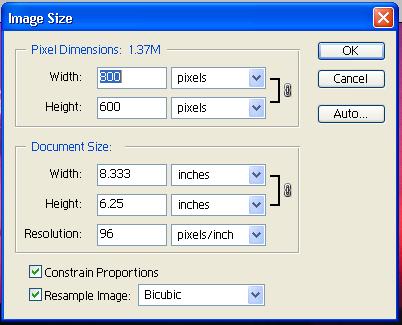
Step # 04: Now change your desire width and height at “Pixel Dimensions” area. Please note, you must not touch width and height at “Document Size” area.

Step # 05: Click ok and save your image with default options.

That’s all you saved your image with desire width and height. But still your document is big in size. Don’t worry continue reading you will get a solutions. Ohh, please note, when you change resolution, the image width and height may be change automatically. Doesn’t worry just ignore it! You must follow the steps sequentially i.e. at first check “Constrain Proportions” then change “Resolution” then change dimensions.

Image files size measure with Byte, Kilo Byte, Mega Byte, etc. Most website permit user in Kilo Byte size. If you want to know more about file size then you need to surf net. But for this tutorial you need to know the hierarchy of unit.

Bit ———- unit
Byte ——— its also an unit but its big then bit by 8 times
Kilo Byte ——– big size then byte 1000 times
And Mega, Giga… so on

Now at first you need to check your image file size. It’s easy, right click of your mouse on to your image and click properties. There you will get information of your image file size. If it is less then restricted size then don’t need to read down. Just upload your image into that site!

So, you have a big file sized image! Don’t worry; I’m here to help you. Just follow these steps –

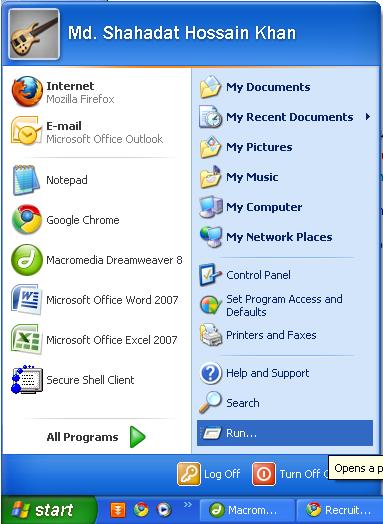
Step # 01: Open ‘mspaint’. Go to start >> click on run
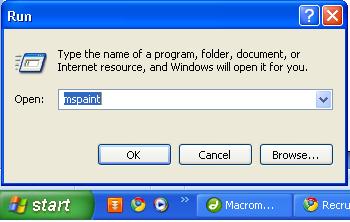
Step # 02: You will get a small box. Type ‘mspaint’ and click ‘Ok’
Step # 03: This command will open Microsoft Piant tools for your service. Open your document.

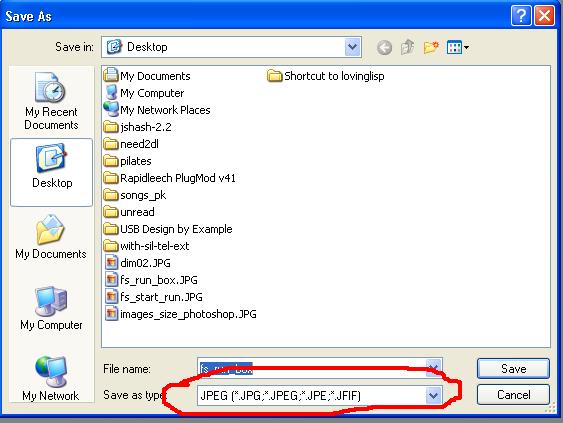
Step # 04: Now save as the document by File >> Save As. Please choice JPEG from ‘Save as type’ drop down list
Step # 05: Save your image with a different name.

Step # 06: Now check file size again by right click on file and go properties.

It’s done! The size is down dramatically.

Enjoy computing…

Posted in Standard, windowsTagged , , , , , , , , , 1 Comment on How reduce your image size without losing quality for using profile picture of web page

Font chooser macro

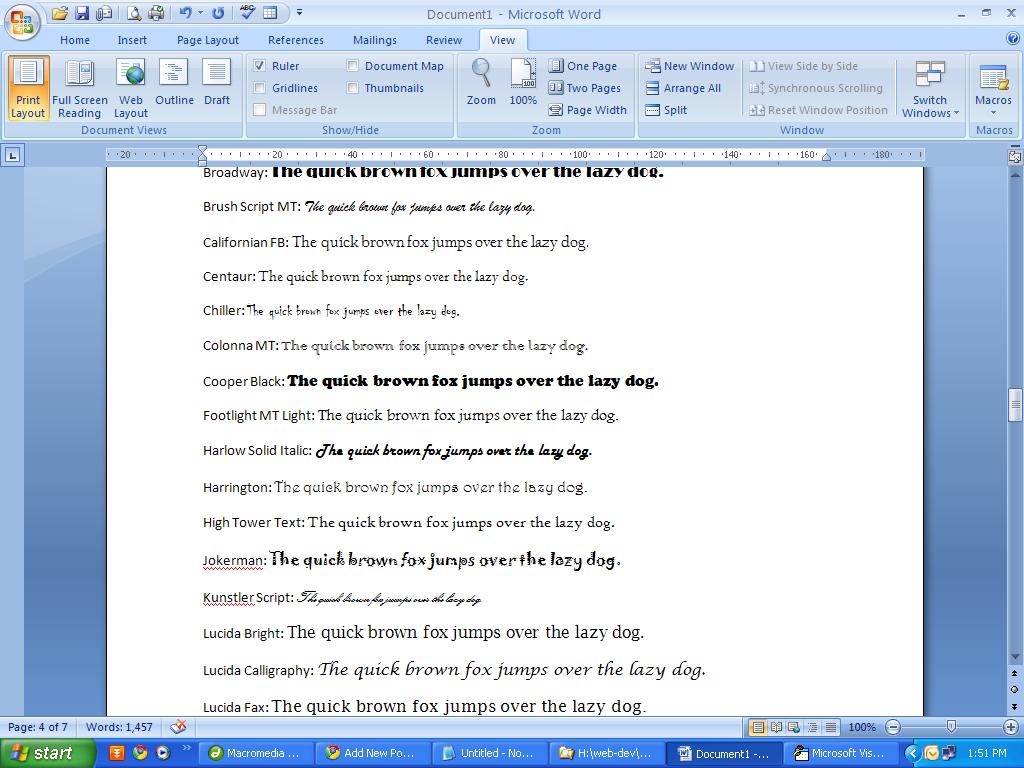
When we need a fine font for specific text we need to write down the text and test the text by changing its font. Its time consuming. So, I make a small macro in microsoft word by VBA macro that prompt you to input the text and draw that text by assigning all available font from your system into different line. Moreover it input the corresponding font name at the starting point of each line.

Here is the macro code FYI:

Sub fontChooserByRazon()
' ' fontChooserByRazon Macro V:1.02 (razonklnbd [at] yahoo [dot] com) ' ' Dim txtStr As String, fntIdx As Long, fntNameLen As Long txtStr = InputBox("Input a text to show through various font of your computer", "Text for font chooser", "The quick brown fox jumps over the lazy dog.") fntIdx = 1 For fntIdx = 1 To Application.FontNames.Count
fntNameLen = Len(Application.FontNames(fntIdx)) Selection.TypeText Text:=Application.FontNames(fntIdx) & ": " & txtStr Selection.StartOf Unit:=wdParagraph Selection.StartIsActive = False Selection.MoveRight Unit:=wdCharacter, Count:=fntNameLen + 2 Selection.StartIsActive = True Selection.MoveEnd Unit:=wdParagraph Selection.MoveLeft Unit:=wdCharacter, Count:=1, Extend:=wdExtend With Selection.Font
.Name = Application.FontNames(fntIdx) .Size = 12
End With Selection.MoveRight Selection.TypeText Chr(13)
Next fntIdx
End Sub


Sub selectedFontChooserByRazon()
' ' selectedFontChooserByRazon Macro V:1.05 (razonklnbd [at] yahoo [dot] com) ' ' Dim txtStr As String, fntIdx As Long, fntNameLen As Long, getInputFromUser As Boolean getInputFromUser = True txtStr = Trim(CStr(Selection.Text)) If Len(txtStr) > 2 Then
getInputFromUser = False Selection.StartOf Unit:=wdParagraph Selection.MoveEnd Unit:=wdParagraph Selection.MoveRight Selection.TypeText Chr(13) Selection.MoveLeft
End If If getInputFromUser Then
txtStr = InputBox("Input a text to show through various font of your computer", "Text for font chooser", "The quick brown fox jumps over the lazy dog.")
End If If Len(txtStr) > 2 Then
Selection.TypeText Chr(13) fntIdx = 1 For fntIdx = 1 To Application.FontNames.Count
With Selection.Font
.Name = "Verdana" .Size = 12
End With fntNameLen = Len(Application.FontNames(fntIdx)) Selection.TypeText Text:=Application.FontNames(fntIdx) & ": " & txtStr Selection.StartOf Unit:=wdParagraph Selection.StartIsActive = False Selection.MoveRight Unit:=wdCharacter, Count:=fntNameLen + 2 Selection.StartIsActive = True Selection.MoveEnd Unit:=wdParagraph 'Selection.EndKey Unit:=wdLine, Extend:=wdExtend Selection.MoveLeft Unit:=wdCharacter, Count:=1, Extend:=wdExtend With Selection.Font
.Name = Application.FontNames(fntIdx) .Size = 12
End With Selection.MoveRight Selection.TypeText Chr(13)
Next fntIdx
End If
End Sub

Here is the screenshot:

This is my first VBA macro… If you have more suitable version please share with me…

Posted in windowsTagged , , , , , , , ,

Prepare USB printer for print through DOS based program like FoxPro

DOS based applications like FoxPro doesn’t detect an USB printer. One way of directing output to USB is by using “net use” at command line

We will use a little trick to work out. We fist share our printer with a share name within 8 digit name. Cause DOS didn’t support more then 8 characters. Then we will use above command. But we need to ensure that we will use text print only.

Now follow these instructions…

  • Share your USB printer and give its name at printer share name
  • Open the printer properties, select ADVANCE tab select “Print Processor” select TEXT and save the change
  • Now use “net use” command
    e.g. NET USE LPT1 \\<computer name>\<printer share name> /persistent:yes

At the command prompt type “DIR >PRN” this must give you print from USB printer, then try printing from your application.

That’s all folk. Now you can write a small batch file to active the printer every time before you go to FoxPro or any other DOS program

Posted in foxpro, windowsTagged , , , , , ,