the fact of real shit

Install secured Proftpd w/o database w/ virtual jailed user

Recently I need to install simple ftp server to provide access. I used Proftpd which is I believe is good (I used in small project). When I starting install, I faced some technical problem and overcome it. So, I think I should write my experience for my personal future reference.

  1. Install proftpd-basic (follow https://mtxserv.com/vps-server/doc/how-to-install-a-ftp-server-with-proftpd-debian-ubuntu or any other good document available by searching internet)
    1.a) Configure to use virtual user
    1.b) Add virtual user using “ftpasswd” command
  2. Configure jail option of proftpd configuration (read – https://portal.hostingcontroller.com/kb/a222/how-to-jail-ftp-users-using-proftpd-server.aspx)
    Remove # (uncomment) in front of below line
    DefaultRoot ~
  3. Configure passive ports
    3.a) At firewall allow 20, 21 and those passive ports (example below)
    ufw allow 49xxx:49999/tcp
    ufw reload
  4. Restart proftpd

-> Test ftp connection

Secure ftp connection with self-signed TLS:

  1. Follow TLS configuration part only from https://www.makeuseof.com/install-proftpd-on-ubuntu/ or any other good document available to configure TLS
  2. Replace “TLSProtocol” settings (follow https://serverfault.com/a/1023382)
    TLSProtocol TLSv1 TLSv1.1 TLSv1.2
  3. Restart proftpd

Now test using FTP client, you may see that host name different than server. As because we used self-signed this type of warning we can ignore.

Posted in linux, ubuntuTagged , , , ,

Install php 7.2 ssh2 in ubuntu 16x

recently i need to install ssh2 connection through my php code to connect remote server by sftp for file transfer. i’m using php 7.2 and face a “sigment fault” issue for normal installation. i solved this issue by install required demon. hope it may help someone who face same issue.

first you need to install/upgrade some basic program

apt-get install gcc make autoconf libc-dev pkg-config

then install base library

apt-get install libssh2-1-dev

now install required php modules

apt-get install php7.2-dev php-pear

now install ssh by pecl (the most important part of installation)

— pecl channel-update pecl.php.net
pear config-show
— pear config-set php_ini /etc/php/7.2/apache2/php.ini
— pear config-set temp_dir /etc/php/temp/pear
pecl install ssh2-1.1.2

ignore commented line OR use if you understand by yourself

now you need to enable ssh2 extension into your php cli installation

echo “extension=ssh2.so” > /etc/php/7.2/mods-available/ssh2.ini
ln -s /etc/php/7.2/mods-available/ssh2.ini /etc/php/7.2/cli/conf.d/30-ssh2.ini

please check you php installation/configuration path. set priority on your own. i set here 30 without proper understanding 😀

now another important part is your PHP code. when we use ssh2 in fopen wraper, in other version of ssh2 connection we need to open a connection and we can use resource id. but with the above change you must use user, password, port i.e. full access information every time we need to connect to server. here is my sample code –

$fh = @fopen(‘ssh2.sftp://’ . $this->user.’:’.$this->pass.’@’.$this->ip.’:’.(intval($this->port)>0?intval($this->port):22) . $pRemoteLocation, $pMode);

all other code like directory creation or any other command execution may be same as before.

Posted in php, ubuntuTagged , , , , , , ,

Install Zend Framework 2 into Windows IIS

This article will show you how you can install Zend Framework 2 into your windows OS without composer.phar help.

1. Download latest stable copy of ZF2 from http://framework.zend.com/downloads/latest and unpack, we call it ZF2

2. Download latest stable copy of ZF2 skeleton app from https://github.com/zendframework/ZendSkeletonApplication/ and unpack, we call it ZF2Skeleton

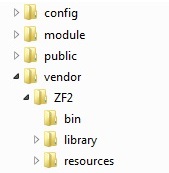
3. Create folder like <ZF2Skeleton folder>/vendor/ZF2. Now copy ZF2/* into <ZF2Skeleton folder>/vendor/ZF2 And the final directory structure may look like following image (for ZF2 version 2.3.1 dated 20140426)

zf2 basic folder structure

4. Now point any domain into “public” folder. e.g. zf2.localhost.tld

  • 4.a. Open notepad as administrator user
  • 4.b. Add an entry to your hosts (file) like – “127.0.0.1 zf2.localhost.tld” [one host in each line]
    • 4.b.1 hosts file is typically located at C:\WINDOWS\system32\drivers\etc\hosts
  • 4.c Now save the hosts file and close
  • 4.d. Now create an entry in your IIS (6 or 7 both are same procedure) by following http://support.microsoft.com/kb/816576 with the above host name i.e. zf2.localhost.tld

5. Now you need to fix ZF2_PATH or $zf2Path variable at “/init_autoloader.php” file of root to point our “/vendor/ZF2” folder

Find following code:

$zf2Path = false;
if (getenv(‘ZF2_PATH’)) { // Support for ZF2_PATH environment variable
$zf2Path = getenv(‘ZF2_PATH’);
} elseif (get_cfg_var(‘zf2_path’)) { // Support for zf2_path directive value
$zf2Path = get_cfg_var(‘zf2_path’);
}

Replace by following code:

define(‘DS’, DIRECTORY_SEPARATOR);
define(‘APP_ROOT_PATH’, dirname(__FILE__).DS);
$zf2Path = false;
if (is_dir(APP_ROOT_PATH.’vendor’.DS.’ZF2′.DS.’library’)) {
$zf2Path = APP_ROOT_PATH.’vendor’.DS.’ZF2′.DS.’library’;
} elseif (getenv(‘ZF2_PATH’)) { // Support for ZF2_PATH environment variable or git submodule
$zf2Path = getenv(‘ZF2_PATH’);
} elseif (get_cfg_var(‘zf2_path’)) { // Support for zf2_path directive value
$zf2Path = get_cfg_var(‘zf2_path’);
}

You can now visit zf2.localhost.tld to get your expected site.

Please note, you must run latest copy of PHP (at least bigger then 5.3.23 when I write this article there I found version 5.3.28 stable for windows non thread safe version installer for download) from http://windows.php.net/download/

Now the problem is URL route in IIS. That means when you lookup into ZF2 getting started docs you may find some code to edit .htaccess of apache. What about IIS in this case?

IIS have solution of URL rewrite problem. Visit www.iis.net/urlrewrite to get the latest copy of the plugin to attach into your IIS installation. Just install this addon/plugin/extension/demon/program whatever name you called.

After installation you need a file web.config into your “<ZF2Skeleton folder>/public” folder. No matter, here we do a small trick. Just download Drupal 7+ core from https://drupal.org/project/drupal and unpack it. There you found a web.config file at root path. Just copy and paste that file into your <ZF2Skeleton folder>/public folder.

That’s all folk!

Posted in php, webdevelopment, windowsTagged , , , , , , , ,

ckeditor installation into drupal with imce

As a professional app developer, I faced to install ckeditor into drupal many times. Each times I need to dig again and again to its working. So, now I think I have to write it down that will help me and others too 😉

Install ckeditor into Drupal with IMCE

Its simple two step > Download & Put it into right place, Configure & use.

Download & Put it into right place

1. Download Drupal module of ckeditor from https://drupal.org/project/ckeditor
2. Download Drupal module for IMCE from https://drupal.org/project/imce
3. Put those module into “sites/all/modules” folder or where you think appropriate
4. Now download full version of ckeditor from http://ckeditor.com/download
5. Put full version of ckeditor into “<path where you put your ckeditor drupal module>/” please visit http://docs.cksource.com/CKEditor_for_Drupal/Open_Source/Drupal_7/Installation for details instruction where to put

That’s it, you are done the first step

Configure & use

Now enable that two module from your Drupal control panel.

1. Fix permission for ckeditor
2. Configure IMCE
3. Configure text format – Administration > Configuration > Content authoring > Text formats
3.a) For Advanced Html >> enable filter “limit allowed html tags” and leave it as it is or put “<a> <p> <div> <h1> <h2> <h3> <img> <hr> <br> <br /> <ul> <ol> <li> <dl> <dt> <dd> <em> <b> <u> <i> <strong> <del> <ins> <sub> <sup> <quote> <blockquote> <pre>” allowed or as your requirement
3.b) For Full Html >> enable filter “limit allowed html tags” and put “<a> <abbr> <acronym> <address> <area> <article> <aside> <audio> <b> <bdo> <bgsound> <big> <blockquote> <br> <br /> <button> <canvas> <caption> <center> <cite> <code> <col> <colgroup> <command> <datalist> <dd> <del> <details> <dfn> <div> <dl> <dt> <em> <fieldset> <figcaption> <figure> <font> <footer> <form> <h1> <h2> <h3> <h4> <h5> <h6> <header> <hgroup> <hr> <hr /> <i> <img> <input> <ins> <kbd> <keygen> <label> <legend> <li> <link> <map> <mark> <marquee> <menu> <meter> <nav> <object> <ol> <optgroup> <option> <output> <p> <param> <pre> <progress> <q> <rp> <rt> <samp> <section> <select> <small> <source> <span> <strong> <sub> <summary> <sup> <table> <tbody> <td> <textarea> <tfoot> <th> <thead> <time> <tr> <tt> <ul> <var> <video> <wbr>” allowed or define tag to allow as your requirement
4. Now configure ckeditor. Specially for file browser settings. Point it to IMCE. Please configure both profile (Full, Advanced)

That’s it. nJoy….

Posted in php, webdevelopmentTagged , , , , , , ,

pure-ftpd status error – pure-config.pl dead but subsys locked

I’m experienced to install VSFTPd and I’m using it for 2/3 years. But for a recent project I need to setup a test linux box and there I install pure-ftpd for test purpose. Its easy to install but when I start the server I face a problem. I’ll tell you that story, but before that story I want to share the experience install pure-ftpd in my linux box.

Everything goes fine with out any problem. I always try to install from source i.e. make and install. And always try to install into default directory if there has no security issue. In this case to install pure-ftpd every thing goes fine as usual. Install complete! Now how can I start the server that I just installed…..?????? Actually in latest version (1.0.29) there has no init script installed. So, I can’t start pure-ftpd by service command!!! So, I search the net, here and there but didn’t find a init script that I can use. So, I decide to make it by myself. For that I go to source directory for getting the default path of the installed program. Owo!!! thats I found the init script. Thanks the pure-ftpd team. But you should write instruction so that our time may saved. So, finally I copy it to “init.d” and started server. Server starting normally. And now the problem arised!!!!!

When I try to get the status of pure-ftpd server for monitoring purpose. It shows following message –

pure-config.pl dead but subsys locked

Ohh, I didn’t mention yet! I use “pure-config.pl” script to start my server. Now, when I get this status message I was worried that I fail to setup properly and start googling on this error. Sad, they all point the wrong direction! Anyway, after 12 hour of searching I realize that it’s not a common problem. Its may be a small mistake that can’t get run pure-ftpd. So, I start to find the problem internally. I find that my server is running well. And I’m able to do ftp through it!!!

Finally, I start digging the init script and perl script for the problem. And find that in init script there has line which checking the status of “pure-config.pl” not pure-ftpd daemon!!! So, I just change to check the status of pure-ftpd instead checking status of “pure-config.pl”.

Actually, what happened there when I try to get status? My init script geting status of pure-config.pl and find that the script is run and not active. But the sub-sys (i.e. pure-ftpd) that start by the script is still running. So, its show status like that!!! And its really confusing, specially for the user of my kind who don’t know linux at all.

Posted in linuxTagged , , , , , , , , ,

Normal user privilege problem for using WiMax USB Modem in windows 7

This is my first post from my laptop. From now on I can write from my home. Recently I buy a Dell Core i3 laptop made in china. Please note, I’m from Bangladesh. Here we all enjoy duty free & all kind of tax fee computer peripheral. Thats why we get these technological facilities with cheap rate. Anyway, Its not my issue. After getting laptop I get a connection from our local WiMax service provider Bangla Lion. Their’s modem is USB modem. Its nice after installation and configuration. Problem is for other users of my laptop…

I always like to use computer with normal user rather then administrator user. Here I can impose many restriction for security reason to fight with VIRUS. So, when I login with my another normal user I fail to connect with my provider… I phone them customer support they didn’t get any solution. So, I start R&D for this issue and finally got success for 6 hours. I’m using windows 7 that was with my laptop and off-course pirated copy (thanks MS, really we Bangladeshi techi personnel can’t achieve the latest trend if we don’t get this facilities). So, guys if you face any problem just do following……

  1. Install your modem with administrator account as usual normal installation. Nothing special while installation process.
  2. Now go to the folder where you installed your modem and change security settings
  3. Add your user’s for permit to use modem with read-write permission to that folders & its content’s and sub-folders.
  4. Then go to windows firewall settings and add your modem software permit for both communication of home and public. I know this may cause a security whole if you can’t trust your provider. But if you trust your provider’s software its not a problem at all.

Actually my modem need write permission to that folder. May be some file it modify before starting to program file path. And it can’t write to that path and forbidden to use the modem.

Hope this post will save someone’s 5~6 hours just for 15 mins…. lols

Posted in internet, windowsTagged , , , , , , , , , ,